How To Make An “Aerogarden” Counter Top Garden For Under $10
Ok, so the headline is misleading. This is not exactly an Aerogarden. It doesn’t squirt nutrient rich juices at the roots of your plants. But it does do the one thing that I think makes the Aerogarden popular, and that it is a garden that sits on the counter without needing additional light sources.
I took this idea from a viral video that was popular about a year ago entitled “How to make a USB greenhouseâ€. Freaky, geeky, interesting thing to do, but really, if there are two important things to remember.
A) Plants need liquid to survive.
B) Liquid fries computers.
Conclusion – attaching a plant to your computer does not fall into the good idea realm.
But the idea was intriguing. I had not done a How To in forever and this looked perfect. Could you make a counter top garden using common LED lights? I did a little research…
It turns out that LED lights are becoming popular for indoor gardening. Low wattage and low heat are making them popular. But there is a catch. You need a combination of various color LED lights to mimic natural sunlight. Plants need blue and red spectrum light to grow correctly. But wait! This project is not dead. There is more.
Blue light is responsible for vegetative growth while red light is responsible for flowering growth. The average “white†LED that you can buy from the store is high on the blue spectrum of light (that is why it has that blue – not white – tinge when you turn them on). They can be used to grow plants where you want the vegetation (that would be the leaves) to grow. i.e. perfect for an herbal counter top garden.
I am a huge fan of fresh herbs. To tell the truth, fresh herbs (ok, the freaking high cost of buying fresh herbs) was the original lure that brought me back to gardening in my college years. I have tried to grow herbs indoors in the winter, but, alas, I really, really suck at it. Well, no, I don’t suck at it. Cleveland just does not have sun power in the winter. As a matter of fact, I am fairly certain that the sun flies south in the winter as far as Cleveland is concerned.
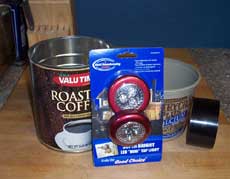
Click on the image above to see a larger image
For this project, you will need:
- 1 large coffee can – free from the recycling bin
- 1 large margarine tub – free from the recycling bin
- 1 pack of two stick on LED night lights – $6.50 at Target
- 1 roll of duct tape – Free if you have an adult male living in your home. If you have an adult male and there is no duct tape, please refer to the reading material of PFLAG as this talk is coming soon.
- Batteries (for the night lights) – $3
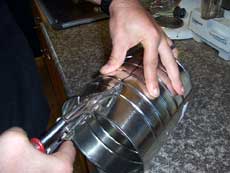
Click on the image above to see a larger image
Start with the coffee can. It needs to be a metallic can. My husband is a coffee drinker, but not a coffee connoisseur, so we just buy the cheapest coffee imaginable, which comes in a metallic can. If you are a coffee connoisseur and your coffee comes in air sealed bags or plastic canisters, you may need to rummage through a neighbor’s recyclable bin some night. Also, it needs to be a coffee can. Not a peaches can, not a industrial size ketchup can. More on this later.
Take the coffee can and mark out an area that is about one third of the can. Leave a 1 – 2 inch lip near the bottom (non open) part of the can. Cut the marked area out. We used tin snips, but you can use what you have available, like perhaps a sawsall (with a throw away blade) or a nail as a punch .
The end result should look like a beginner, flat broke fanboy’s attempt at a helmet for the renaissance festival.
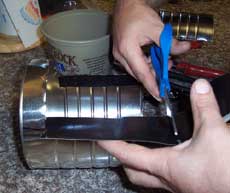
Click on the image above to see a larger image
The edges on the can will be very sharp, so be careful. The author of this post is NOT responsible if you severely cut yourself and must be rushed to an emergency room which cost millions of dollars and you then feel you must sue the author to recoup the costs. I warned you. I am just about broke anyway. So just be careful.
Because the edges are sharp, we need to cover them. Take the duct tape and use it to cover all of the cut edges of the coffee can.
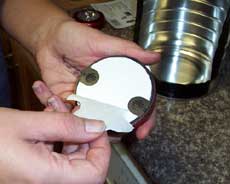
Click on the image above to see a larger image
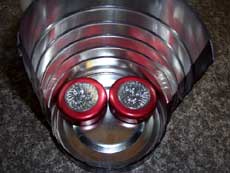
Next, remove the paper backing on the LED night lights. The night lights I bought had 3 LEDs each. The more LEDs in the night lights, the better.
You can put up to 4 night lights in the can (which I may do later, depending on how the plants grow) but then this would be a $15 counter top garden. Your choice.
Click on the image above to see a larger image
Stick the night lights to the can. Place them as far back as possible. This will ensure that more of the light stays inside the can.
The reason the metallic can is important is because we need to try to keep as much of the light bouncing around for as long as possible. The metal will reflect the light back at the plants where plastic would just absorb it.
Click on the image above to see a larger image
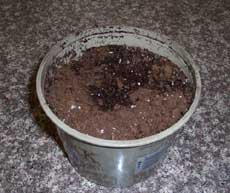
Next, prepare your margarine tub. Again, it must be a large margarine tub. Other tubs will not work. More on this later.
If you would like, you can cut drainage holes in the bottom. I did not because I did not want to worry about water draining out over the counter. But I will need to make sure I do not over water my plants. You can also add a layer of Styrofoam peanuts or gravel to the bottom of the tub to help with drainage. I use normal potting soil in my margarine tub.
Click on the image above to see a larger image
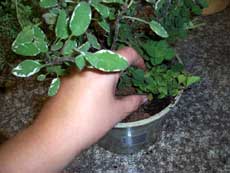
Next, plant your herbs. Mine were dug up from the garden. I will warn you, most people will want to make this in the Fall. Plant stores don’t sell herb in the Fall. I know, I went to 4 of them and not one had herbs. Plan ahead or get your herbs from an established garden.
The type of herbs you use are up to you. I chose sage, thyme, rosemary and oregano. I may start a whole new counter top garden just for basil.
Click on the image above to see a larger image
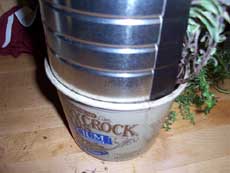
Now, here is the step where I explain why you must have a coffee can and a margarine tub. If you look in your margarine tub, you will see a little lip about a quarter to a half inch down on the inside. Your inverted coffee can will sit exactly on that lip, so that the coffee can will not sink into the soil.
Turn on the lights and place the can over the plants. Trim back as much as you can of any plants poking out of the opening. Plants growing outside the opening will not live. The plants will only live if they grow inside the can.

Click on the image above to see a larger image
Make sure you use the herbs A LOT. This will keep them compact and bushy, so that they do not outgrow the can.
So there you go. A counter top garden for herbs that you can make. Yes, it does look like you ran away with the Black Knight’s helmet and used it for a planter, but that’s what you get for being cheap.
And yes, I know, having the light on all the time is not the healthiest thing for plants. Yes, I know, this is not the ideal growing light for plants. But the point of this is not to create an ideal environment or even pretty plants. The idea is to have fresh tasty herbs without having to sell one of my children to gypsies in order to pay for it. It is a “make due†until the sun once again graces us here in Cleveland.

Great Idea!
hm, mulling over how to translate this into a small bin for swiss chard. Or maybe just plant them in a clear bin and set it next to a south facing window.
Hi Hanna,
I haven’t commented in awhile as I can’t taste your tomatoes and I have my favorites. I too have tried the window sill garden in the past. I like this idea. You, however must be on the alert for protests from PETP (People for the Ethical Treatment of Plants). I just finished watching Penn and Tellers piece on PETA. It came through Bligbi (another RSS I get). I may have to try this. Also, another name for Duct Tape is Man Tape as we use it for anything.
Clever, hilarious, and just plain entertaining. Thank you.
Great post, I could never justify the ridiculous cost of an aerogarden. There is also the fact that I have ample sunshine and no frost so I can grow outside all year round.
In Australia they say if it can’t be fixed with duct tape, fencing wire and zip ties, it ain’t worth fixing.
This is a great project! I’m a hydroponics tinkerer myself and have made some small tabletop hydroponic systems, but it never occurred to me to use LED’s for light. Because the heat from LED’s is so minimal you can put them very close to the plant’s leaves, effectively making them as good as a farther-away-but-brighter light source (i.e. the same number of photons per square centimeter fall on the plant’s leaves).
With a little more money (not much) and a little soldering, you could use Luxeon high-output LED’s in a project like this. They’re far brighter than the LED’s used in this project, and they’re available in all the usual LED colors (red, white, blue, green). I’m thinking either a mix of red and blue or red and white, so the spectrum would be suitable for either vegetative or flowering growth. A simple plug-in timer could allow for control over the daily light cycle, too.
After reading your story about spilling liquid on your laptop I can understand your reluctance to mix computers and liquids, but in the case of a USB greenhouse, there should be no problem. The USB port supplies a mere 5 volts, not enough to short-circuit through water, and a long enough USB cable would keep the liquid far enough away from the computer to minimize the risks of a “spill-and-kill” event.
Hanna,
Words can’t begin to adequately describe how clever you are.
Mim
Newbury, Ohio
Ooh, this is a fabulous idea! Not to mention now I have an idea for how I can get my seedlings to actually grow in the spring when the room on my one windowsill runs out.
This is awesome. You’re like the MacGyver of gardening!
Husband, son, Dad, brothers- all are of the opinion that if it moves and shouldn’t it can be fixed with duct tape. If it DOESN’T move and it should, use the WD-40!
By the way, I can’t wait to try this planter!!!
Now that is a VERY cool idea!
Also – I thought of you when I read this article: http://www.tampabay.com/news/humaninterest/article847365.ece His lawn was illegal, and he even got sent to jail because of it. 🙁
You are awesome!!! I have read a few of your posts….loved the one about ten gardening tips for potted plants (renting=potted plants). A girl after my own heart, gardening on a budget!
Hi Hanna,
You mean I can have fresh basil around Tahnksgiving?? I may weep with joy. I managed to keep my Rosemary alive last winter, but I couldn’t figure out basil. Thank you so very very much!
I can’t believe I JUST found your blog, but I can’t wait to read more. (I love the comment that you’re the MacGyver of gardening!) Basil all year–now that will be a treat!
I SO want to try this. I could turn my whole office into a work-from-home slash food-growing-experiment.
I gave you a stumble. 🙂
would this work for growing marijuana?
hahah the name of this blog should be
“this garden is hysterical”
You’re funny! I’ve added you to my blog following list. Looking forward to reading more, and trying to convince my friend who wanted an AeroGarden to try this project!
That is genius. I adore it. Too bad my herbs have all been fried (here in Toronto, we’ve had actual snow).
I’ll bookmark it for next year though. Thanks!
It’s elegantly low-tech. I like it.
I also do food and gardening things at http://red-icculus.com
the main idea behind the aerogarden is the aeroponics method of watering/feeding the plants. your method does nothing more than shine a flashlight on some plants. im certain you’d have better luck removing the whole top and letting some more of the rooms light shine on the plants.
And yes, if you had bothered to take 2 min to actually read, you would have read that this is not an Aeroponic garden and that LED light provides the correct light waves for plant growth.
Don’t comment if you don’t read. It doesn’t make you a jerk, it just makes you stupid and annoying. *rolls eyes*
this is great! i’m totally going to make one! duct tape is awesome, but why does a “male adult” sans duct tape suddenly = homosexual? at least, i’m pretty sure that’s what you were implying. i kept going back and re-reading that part. i’m usually not sensitive about things like this, but i was a little irked when i read that. as a queer and a feminist, it just seemed a little much and could be misconstrued by your readers as justifying and encouraging homophobia… not good! but, seriously, other than that off-putting comment this tutorial was great! i’m moving into an apartment with very few (small) north-facing windows. ugh. hope this will help me out!
I love this idea. I can imagine anyone who visits your kitchen remarks on it. There aren’t a lot of blog posts that I read top to bottom but this one was great! I’m subscribing to your feed. :0)
Billed as the world’s first self-contained indoor garden appliance, Aerogarden promises dirt-free and virtually set-and-forget produce.
This was a great tips and can save money in aeroponic system development.Anyway thanks a lot…
aeroponicsystems.net
Comment deleted. Play by the rules or just don’t play. 😉
Just came across this post today from a google search. My question….. Did it work?
Did it work?
Love this website. I’m all about making your own stuff rather than buying it.
I’ve dabbled in solar cooking and many of the principles are the same, such as reflective surfaces to hold onto light. I wonder if a box covered (on the inside) in foil (to keep the cats from eating everything) with a full spec light inside would work. We have a full spectrum lamp, so all we’d need would be potting soil and some seeds (we want to grow lettuce).
Oh, and I posted one of my articles on making your own stuff, we’re really broke and I get paid for people who visit this so please please please please please check it out and click on the ads).
this is just too cool of an idea! It sparked an explosion of rapid thoughts in my mind for sure of all the ones I could make. Thank you so much for your ingenuity and the very clear instructions! 🙂 Fabulous!